

Use sequences to automate outreach with your contacts. You can enroll individual contacts from the contact's record or select up to 50 contacts to enroll in bulk.
Customize the follow-up send times for each contact, edit the delays between sequence steps, then personalize each email before enrolling contacts to increase your rate of replies.
If a contact in the Subscriber lifecycle stage is enrolled in a sequence, their Lifecycle stage property will be updated to Lead.
Enroll a contact in a sequence
You can enroll a single contact from their record in HubSpot.
- In your HubSpot account, navigate to Contacts > Contacts
- Select a contact to enroll
- In the left panel, click the Email icon email

- In the pop-up box, click Sequences
- In the dialog box, hover over the sequence and click Select
- In the Enroll sequence dialog box, customize the step delays and follow-up options
- At the top, click the Start at dropdown menu and select the step at which you want the contact to start the sequence. Then click the Time zone dropdown menu and select a time zone. All sequences emails and tasks will be sent or created in the selected time zone.
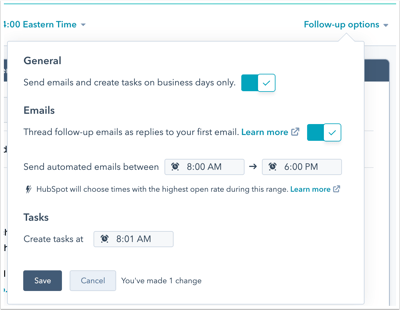
- To customize the default follow-up options for the sequence, including when subsequent sequences emails should be sent and when tasks should be created, click Follow-up options in the upper right. These settings will override the sequence's default settings
- By default, sequence emails are only sent on business days. If you want emails to send on Saturday and Sunday, click to toggle the Send follow-up emails and tasks on business days only switch off
Please note: when your sequence is set to only send emails on business days, the delays will only count the business days between each step. For example, if an email is sent on a Thursday at 5pm and the following email is scheduled to send three days later, the next email will send on Tuesday at 5pm (three business days after the previous email was sent).
- To keep emails in the sequence threaded, click to toggle the Thread follow-up emails as replies to the first email switch on
- To customize the timing of each email send in the sequence, use the Send automated emails between time pickers to set a time range. HubSpot will then determine the best time to send the email within the specified time range
- To create follow-up tasks in the sequence at a default time, in the Tasks section, click the Create tasks at time picker and select a new time from the dropdown menu
- Click Apply
- On each sequence email, you can customize the number of days or weeks that will pass before the next email sends. You can also enter a value for any missing placeholder tokens, or tailor the email content to the recipient
- By default, the first email in the sequence will be sent as soon as possible, but to specify the send time, click the dropdown menu and select a date and time
- For each following email, click the Send email in dropdown menu and select how many days or weeks should pass after the previous step before the email is sent
- If you're using placeholder tokens in an email and values are missing for the selected contact, the tokens will appear in red at the top. Click a token, then enter a value and click Update all. Repeat for each token in the template

- At the bottom of the email template, use the rich text toolbar to format the text or insert a link, snippet, document, or add a video
- On each sequence task, you can customize the number of days or weeks that will pass before the next task is created
-
- To create a task immediately after the previous step executes, on the task step, click the dropdown menu and select Create task immediately. Or, click the dropdown menus and select the number of days or weeks that should pass after the previous step before the next task is created
- You can also edit the task title. On a sequence task, enter a new title in the Task title field
- By default, a sequence will pause until the preceding task is complete. To continue the sequence even if that task is incomplete, select the Continue without completing task checkbox

Please note: if there is a delay between the task and when the next step is scheduled to execute, the delay does not begin until the task is complete. This means if you have an email scheduled to send two days after a task, the sequence will not start the two-day delay until the task is complete.
- If your user has multiple inboxes connected to HubSpot, at the bottom, click the From dropdown menu and select an email address to send sequence emails from
- When you're ready to enroll your contact, click Start sequence in the bottom left

When a follow-up task reminder includes an email template, the task will be created when the contact reaches that sequence step. From your task dashboard, you can then click the name of the task to navigate to the contact record and send the email. The email composer will open with the email template’s content already populated.

You can also start a sequence from your inbox using the HubSpot Sales extension.
Enroll multiple contacts in a sequence
Users with Bulk enroll sequences permissions can enroll up to 50 contacts in a sequence at once. Enroll multiple contacts when you need to follow up with contacts after a trade show or conference, reconnect with contacts from inactive accounts, or send targeted messages to a segmented list of prospects.
Please note: HubSpot sends sequences emails one at a time from a single queue. If multiple sequences emails are scheduled to send at the same time, the sends will be staggered by 30 seconds.
Select multiple contacts to enroll from the contacts home:
- In your HubSpot account, navigate to Contacts > Contacts
- Select the checkboxes next to the contacts you want to enroll
- If needing to use filters to ensure your messaging the right people, it is strongly advised to use the filters below:
- Contact Owner is Me
- Contact Status is [Prospect/MQL/SQL/SRL/Customer]
- Status Milestone [of above status] is any of / is none of
- If needing to use filters to ensure your messaging the right people, it is strongly advised to use the filters below:
- At the top of the table, click Enroll in sequence

When enrolling multiple contacts, first you will customize the follow-up options and delays and for all contacts in the sequence.
- To select all contacts, in the left panel, click All contacts

- At the top, click the Start at dropdown menu and select the step at which you want all contacts to start the sequence. Then click the Time zone dropdown menu and select a time zone. All sequences emails and tasks will be sent or created in the selected time zone
- To customize the default follow-up options for the sequence, including when subsequent sequences emails should send and when tasks should be created, click Follow-up options in the upper right. These settings will override the sequence's default settings
- By default, sequence emails are only sent on business days. If you want emails to send on Saturday and Sunday, click to toggle the Send follow-up emails and tasks on business days only switch off
- To keep emails in the sequence threaded, click to toggle the Thread follow-up emails as replies to your first email switch on
- To customize the timing of each email send in the sequence, use the Send automated emails between time pickers to set a time range. HubSpot will then determine the best time to send the email within the specified time range
- To create follow-up tasks in the sequence at a default time, in the Tasks section, click the Create tasks at time picker and select a new time from the dropdown menu

- Click Apply
- On each sequence email, you can customize the number of days or weeks that will pass before the next email sends
- By default, the first email in the sequence will send as soon as possible, but to specify the send time, click the dropdown menu and select a date and time
- For each following email, click the Send email in dropdown menu and select how many days or weeks should pass after the previous step before the email is sent
- On each sequence task, you can customize the number of days or weeks that will pass before the next task is created
- To create a task immediately after the previous step executes, on a task step, click the dropdown menu and select Create task immediately. Or, click the dropdown menus and select the number of days or weeks that should pass after the previous step before the next task is created
- By default, a sequence will pause until the preceding task is complete. To continue the sequence even if that task is incomplete, select the Continue without completing task checkbox
Next, personalize the email content for each contact. When enrolling multiple contacts, you need to select each contact from the left panel, one at a time, and customize the email content as needed.
- In the left panel, click a contact. Use the search bar as needed to search for specific contacts. There will be an alert for any contact missing values for the placeholder tokens included in the email

- If you're using placeholder tokens in an email and values are missing for the selected contact, the tokens will appear in red at the top. Click a token, then enter a value and click Update all. Repeat for each token in the template

- You can make any edits to the email templates used in the sequence. At the bottom of the email template, use the rich text toolbar to format the text or insert a link, snippet, document, or add a video
- You can also edit the task title. On a sequence task, enter a new title in the Task title field
When you're ready to enroll your contacts, you can enroll each contact one at a time or all at once:
- To enroll contacts one at a time, click Enroll [contact name], then in the dialog box, click Enroll
- To enroll contacts all at once, in the bottom right, click Enroll [all] of [total #] contacts. Then in the dialog box, click Enroll [total #] contacts

- If you're not ready to enroll a contact in the sequence, click Remove contact in the upper right
After enrolling your contacts, you can monitor how they're engaging with your sequence from the sequence summary page. You can also analyze your sequence's performance over time to ensure you're seeing a successful number of replies and meetings booked.