Clear communication and well-defined goals are essential for successful marketing campaigns. Enter the marketing request form—a powerful tool that bridges the gap. In this blog post, we’ll provide practical tips on creating and following up with marketing requests. Let’s dive in!
|
Quick Links jump ahead to a section using these quick links! |
Submitting a Request
Any marketing request – apart from our weekly buyer asset promotion emails and individual asset/auction promo requests – is to be submitted through our new Marketing Request Form. On the form, you will find a simple guide on how to submit a request, which will always be available to you.
IMPORTANT: Including the most information possible will allow Marketing to get started on the request as soon as possible. Not providing all relevant information will delay the process.
Once you've submitted the request, you will see the following message as well as receive an email confirmation with the details of your request.

Accessing request
The easiest way to check on the status of your request is to click on the View Request button in the confirmation email, as this will take you directly to the request record.

However, there are a couple other ways you can access your submitted requests - including seeing everything you've requested.
Use Advanced Filters
You can access all marketing requests in HubSpot through the navigation: CRM > Marketing. Once there, you can view all requests, across all marketplaces in list form, or all requests, by a specific marketplace in board view. Changing the pipeline name will change the marketplace.

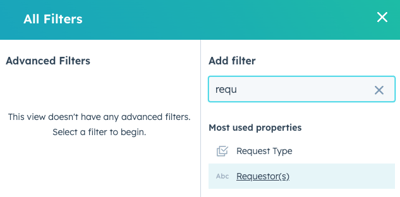
- To find your requests, click on the Advanced filters
- Search and select the property name Requestor(s)

- Enter in the name used on the request form

Use Your Contact Record
If using your email address when submitting the form, all your requests will be synced with your contact record in HubSpot. Simply navigate to CRM > Contacts (quick link) and search for your email address. Click on your name to open the record.
 Once the record is opened, look on the right side panel and scroll until you see the header Marketing. You can click on the specific request name to open the specific request, or you can see all requests by clicking View associated Marketing.

Navigating the Request Record
.gif?width=409&height=441&name=chrome-capture-2024-4-16%20(1).gif) Left Pane
Left Pane
The left navigation panel holds all the request information - including all the fields submitted on the initial request.
Here is where everyone will see the type of request, audience to target, who owns which portion of the request - and so much more.
Marketing will make updates here if/when needed.
Middle Pane
In this section you will find every single activity associated with the request. From notes to tasks to attachments and more - this will chronologically display all the activity from start to finish.
From this view you can:- Add comments to notes and tasks as needed from this view to provide additional information
- Add a note with links or attachments as necessary
PRO TIP: Tag relevant people so they are notified when you leave a comment. Simply use the @ symbol, and start typing their name - tag as many people as you like!
.gif?width=600&height=297&name=chrome-capture-2024-4-16%20(2).gif)
Right Pane.gif?width=402&height=345&name=chrome-capture-2024-4-16%20(3).gif)
This view shows how the request is connected to other records and assets within HubSpot.
In this pane you can:
- Upload additional attachments by selecting Add, and uploading the document(s) from your computer
- Find associated records, for example, if this request is part of an RFP, or in conjunction with another marketing request you'll see those records associated
Review / Approval Process
When the marketing team assigned to the request has completed the work and is ready for your review, a HubSpot task will be assigned to you. In this task you'll find all the relevant information needed to review, and HubSpot will send you an email informing you of the task, with a direct link to view and action. You can also find all your tasks at any time in HubSpot by navigating to CRM > Tasks.
IMPORTANT: If you do not respond to these task notifications, your request will be placed on hold and eventually marked as abandoned.
TIP: Edit your notification settings on how you'd like to recieve notifications (email, SMS, teams, etc.).
Troubleshooting
- Single Sign On: you must use SSO to log into HubSpot and access the request. Any error messages should be raised with IT.Support@liquidityservices.com or Megan Beer.
- Incomplete setup: you can bypass the screen to finish setting up your account by scrolling to the bottom of the page and dismissing the message.
- Unable to locate request: in the event you are unable to locate your request, please contact your marketing team. We highly recommend saving all email confirmations of your requests for easy access.

